Fix “Extend Volume Greyed Out” — Extend C Drive Without Reinstalling Windows
In this article
Why Extend Volume is greyed out
Windows can only extend a partition into unallocated space that is directly to the right of that partition on the same disk. If a data partition sits behind drive C:, Disk Management cannot extend C: and the option appears greyed out.
System SSD = 500GB • C: = 200GB • Data partition = 300GB (located immediately after C:)
Solution overview
Instead of attempting risky moves or reinstalling Windows, we will:
- Clone the blocking data partition to a second disk (with free space)
- Verify the cloned partition (Properties + Check for errors)
- Delete the original data partition on the SSD to create unallocated space next to C:
- Extend drive C: using Windows Extend Volume wizard (use all unallocated space)
Before you start (important)
- Make sure you have a second disk (HDD/SSD) with enough free space for the cloned partition.
- Double-check the source and target selections before starting the clone.
- After cloning, always verify the cloned partition before deleting anything on the system SSD.
- If the partition is BitLocker-protected, keep your BitLocker recovery key available just in case.
Step-by-step: clone → verify → delete → extend
-
Download and run Lazesoft Recovery Suite Home Edition
Download and install Lazesoft Recovery Suite Home Edition, then run it in Windows.
In the main UI, click Disk Image & Clone.
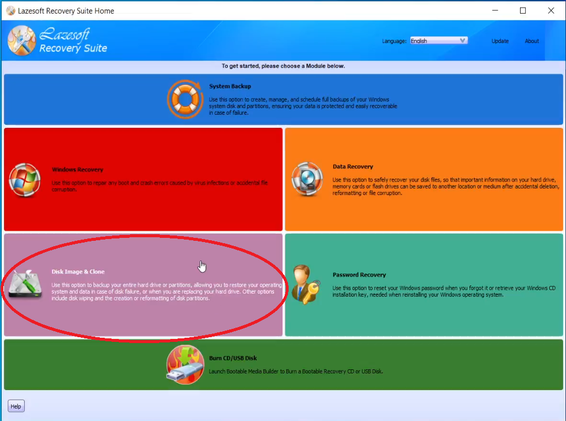 Click Disk Image & Clone from the main screen.
 -
Open Partition Clone
Click the Partition Clone option.
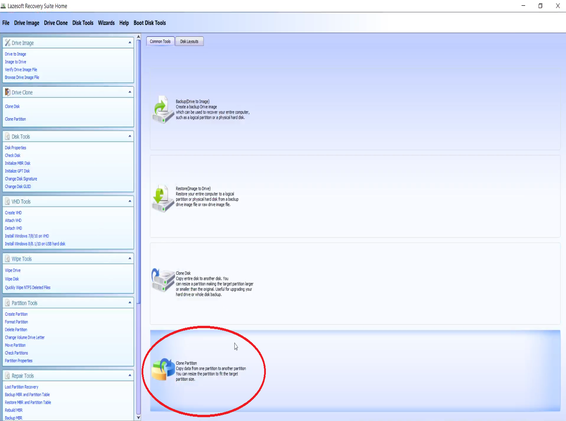 Choose Partition Clone to copy the entire partition safely.
 -
Select the data partition behind C: as the source
Select the data partition located immediately after drive C: on the system SSD as the source. This is the partition that blocks extending the C drive in Disk Management.
Tip: Confirm the correct partition by checking its size, label, and position on disk.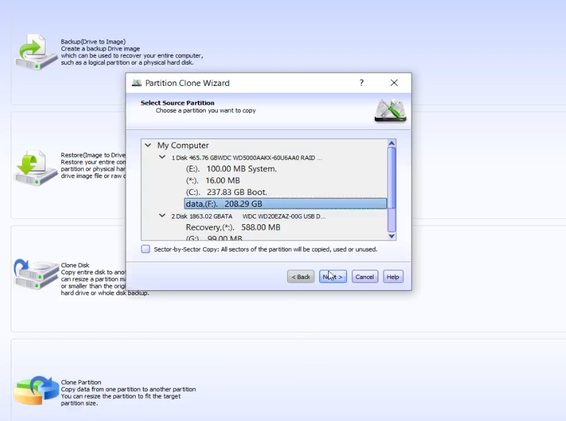 Source: the data partition behind C: (the partition blocking extension).
 -
Select unallocated space on another disk as the target
For the target, select unallocated space on a second disk (HDD/SSD) with enough capacity.
Important: Make sure the target is on the second disk, not the system SSD.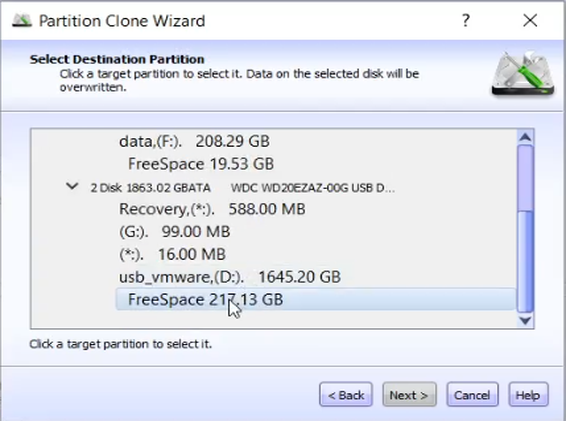 Target: unallocated space on another disk (enough space for the whole partition).
 -
Start cloning and wait for completion
Click Start to begin the clone process. This copies the partition structure and files. It is also suitable for partitions protected by BitLocker (keep your recovery key available just in case).
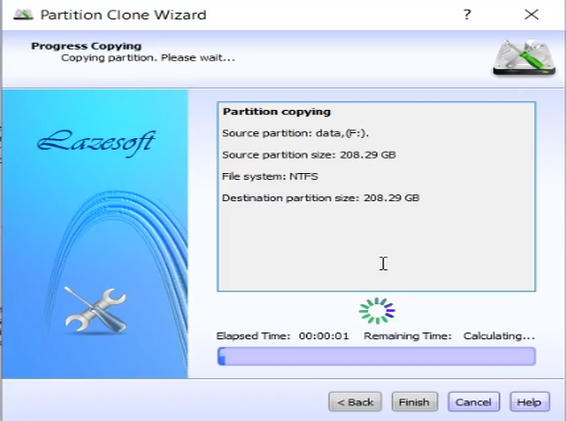 Partition clone running. Wait until it finishes successfully.
 -
Verify the cloned partition (Properties + Check for errors)
After cloning finishes, do not delete the original partition yet.
In Windows File Explorer (or Disk Management), open the cloned partition’s Properties, then run Check for errors.
This verifies file system integrity and confirms the cloned partition is healthy.
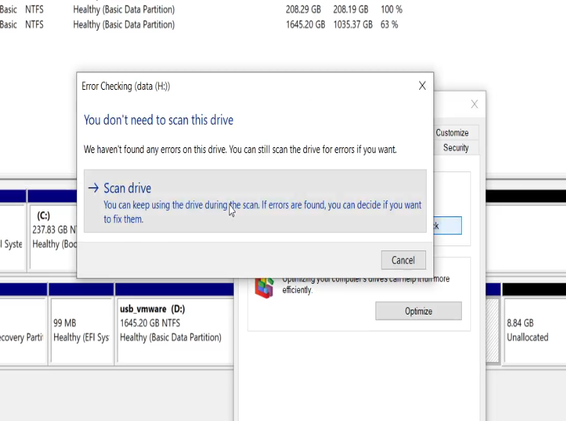 Verify: right-click the cloned drive → Properties → Tools → Check.
 -
Delete the original data partition on the SSD
Once verification passes, delete the original data partition on the system SSD (the partition behind C:). This creates unallocated space immediately next to C:.
Only do this after your cloned partition is verified and your data is confirmed safe on the second disk.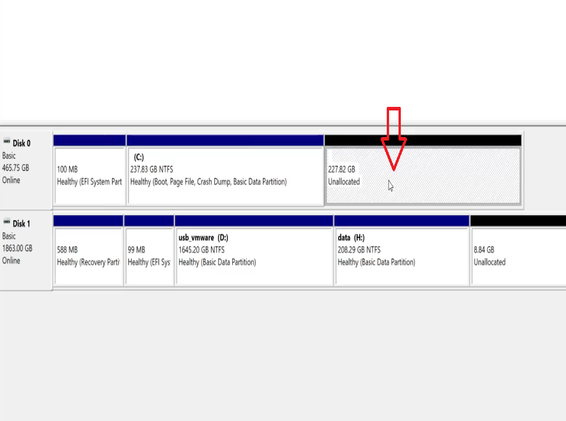 After deleting the blocking partition, unallocated space appears next to C:.
 -
Extend drive C: using the Windows Extend Volume wizard
Now you can extend C: directly in Windows:
- Right-click drive C:
- Select Extend Volume from the context menu
- Keep the default settings so Windows uses all unallocated space
- Click Next → Finish
Using the default settings is the easiest option if you want to take all unallocated space for C:. Right-click C: → Extend Volume → keep defaults → Finish.
Expected result
- Drive C: is larger and has more free space
- Windows continues running during the process
- No reinstall, no bootable USB required for this workflow
- Your original data is preserved on the second disk (cloned partition)
FAQ
Why can’t Disk Management move partitions?
Windows Disk Management can create, delete, shrink, and extend partitions, but it cannot move partitions forward/backward on disk. That’s why C: cannot be extended when another partition sits behind it.
Is it safe to delete the blocking partition after cloning?
Yes—if you first confirm the cloned partition is healthy. Always verify the clone by checking the drive properties and running Check for errors before deleting the original partition.
What if the partition is BitLocker-encrypted?
Partition cloning can copy the partition structure and data. Keep your BitLocker recovery key available. After cloning, verify the cloned partition and make sure you can access your files before deleting the original.
Can I keep some unallocated space instead of using all of it for C:?
Yes. In the Extend Volume wizard, you can adjust the size. For most users, keeping the default setting (use all unallocated space) is the simplest choice.
Disclaimer: Always back up important data before modifying partitions. This article is for educational purposes.
Related resources
Free for Home Users
Lazesoft Recovery Suite Home Edition is 100% free for home users.
Download LazesoftQuick Checklist
- Second disk has enough free space
- Clone blocking partition behind C:
- Verify clone: Properties → Check for errors
- Delete original partition on SSD
- Right-click C: → Extend Volume
- Keep default size to use all space
Related Articles
Need a Video?
If you recorded the process, you can publish it as a tutorial:
“C drive full, extend volume greyed out — clone → extend (no reboot)”