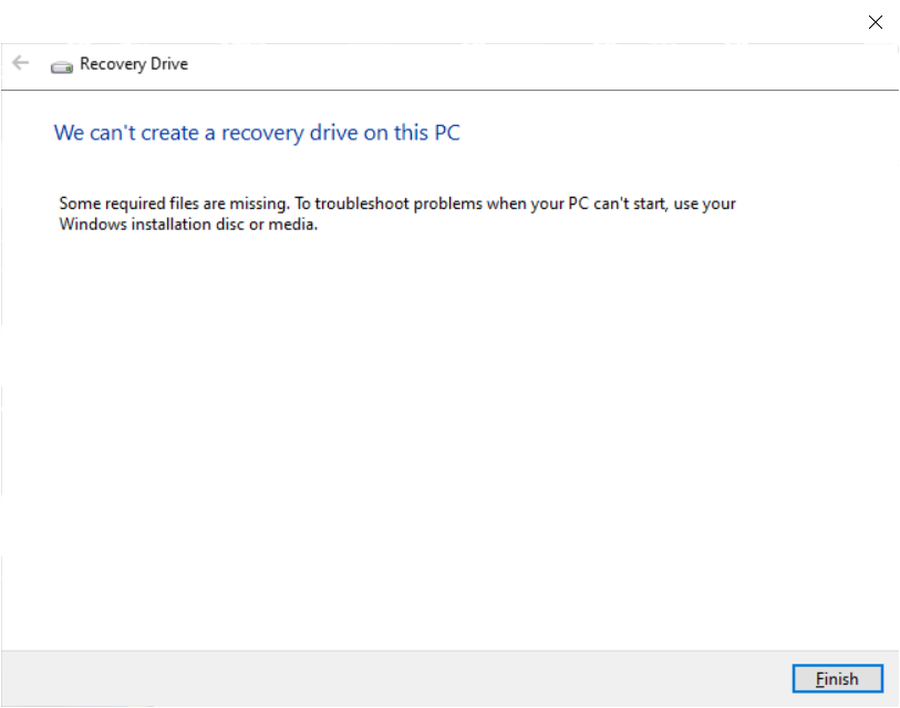
Fix “We Can’t Create a Recovery Drive on This PC” in Windows 10/11
If Windows shows the message “We can’t create a recovery drive on this PC. Some required files are missing.”, the built-in Recovery Drive wizard cannot find a usable Windows Recovery Environment (WinRE). This problem is common on Windows 10 and Windows 11 systems after cloning, repartitioning, manual cleanup, incomplete repairs, or older OEM installations.
The important point is this: in the failure scenario shown here, the issue is not just either a missing recovery partition or a missing Winre.wim file. In this case, Windows RE is disabled, there is no recovery partition, and there is no usable Winre.wim registered under C:\Windows\System32\Recovery. Because both are missing from the active recovery configuration, the Recovery Drive wizard has nothing to use.
The good news is that this can still be fixed. If you copy a valid Winre.wim file from a Windows ISO, register it, and enable Windows RE again, Windows can create or use recovery features normally.
What Causes “We Can’t Create a Recovery Drive on This PC”?
Windows Recovery Drive depends on Windows RE. Normally, Windows RE is stored in a hidden recovery partition, and Windows registers that location internally. On some systems, the needed file can also be restored and registered from C:\Windows\System32\Recovery.
When the Recovery Drive wizard fails, the most common reasons are:
- Windows RE is disabled
- The recovery partition is missing
Winre.wimis missing fromC:\Windows\System32\Recovery- The recovery image path is not configured
- The system was cloned or repartitioned and recovery settings were lost
In the scenario documented here, the failure is caused by a combined condition: there is no recovery partition, and there is no active Winre.wim file configured for WinRE. That is why simply opening the Recovery Drive wizard results in the “required files are missing” error.
How to Confirm the Real Cause
Before fixing the issue, confirm the current recovery status.
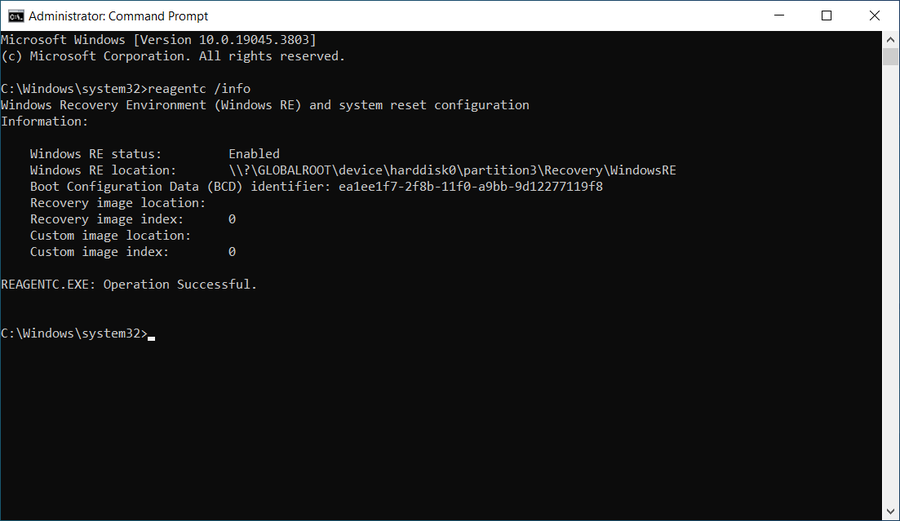
Step 1: Check Windows RE status
Open Command Prompt as Administrator and run:
reagentc /infoIf Windows RE is disabled and no recovery image location is configured, you will see something like this:
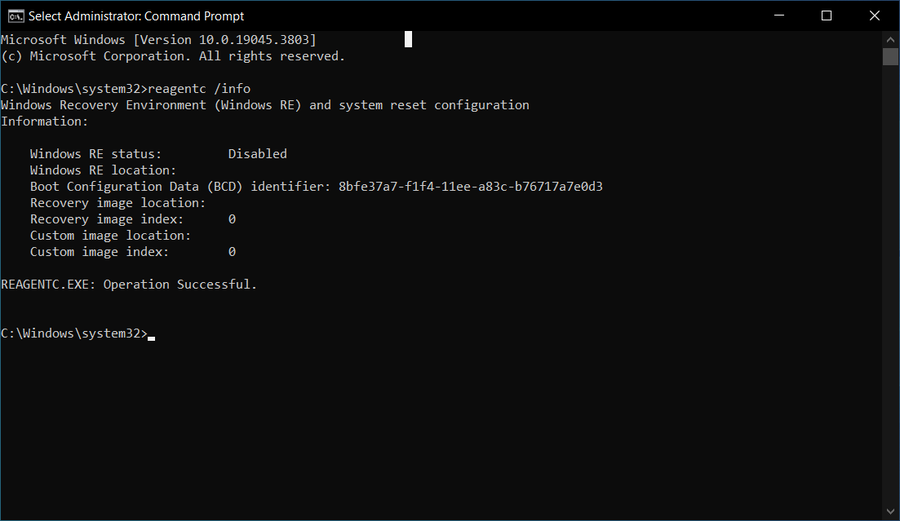
This output is a strong sign that Windows cannot find a valid recovery environment.
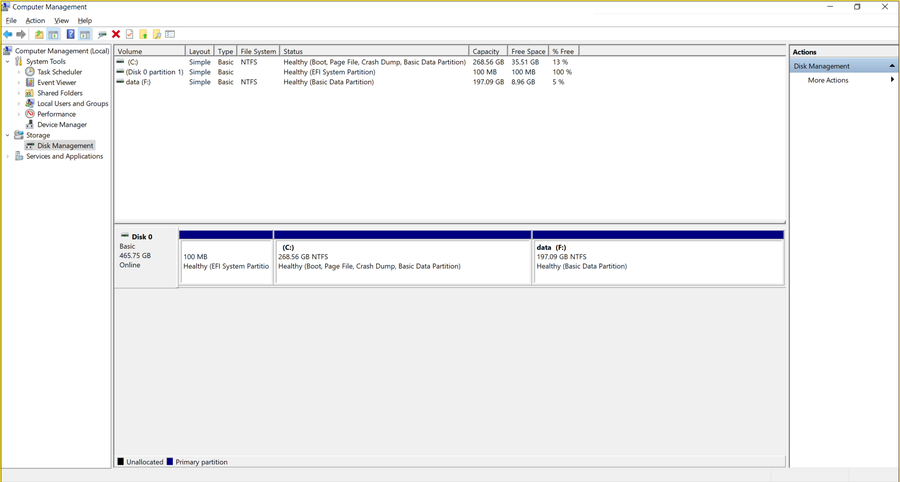
Step 2: Check Disk Management for a recovery partition
Open:
diskmgmt.mscLook for a small hidden partition typically labeled Recovery, often around 450 MB to 1 GB. In the example below, the disk has an EFI partition, the C: partition, and a data partition, but no recovery partition exists.
Winre.wim file.Step 3: Check whether Winre.wim exists locally
Browse to:
C:\Windows\System32\RecoveryIf Winre.wim is missing there as well, then Windows has neither its normal recovery partition nor a local recovery image file available. In this situation, copying Winre.wim from a matching Windows ISO is often enough to repair the problem.
The Practical Fix: Copy Winre.wim from a Windows ISO
If there is no recovery partition and no Winre.wim file in C:\Windows\System32\Recovery, the repair is often straightforward:
- Obtain a matching Windows ISO
- Extract
Winre.wimfrom the ISO - Copy it into
C:\Windows\System32\Recovery - Register the recovery image path
- Enable Windows RE
That is exactly why this issue should be described as a case where both the recovery partition and the usable WinRE image are missing from the active configuration, not simply one or the other.
Where to find Winre.wim inside the Windows ISO
In many Windows installation images, Winre.wim can be found inside the Windows image under a path like:
\sources\install.wim
or
\sources\install.esd
Then navigate inside the selected Windows image to:
\Windows\System32\Recovery\Winre.wim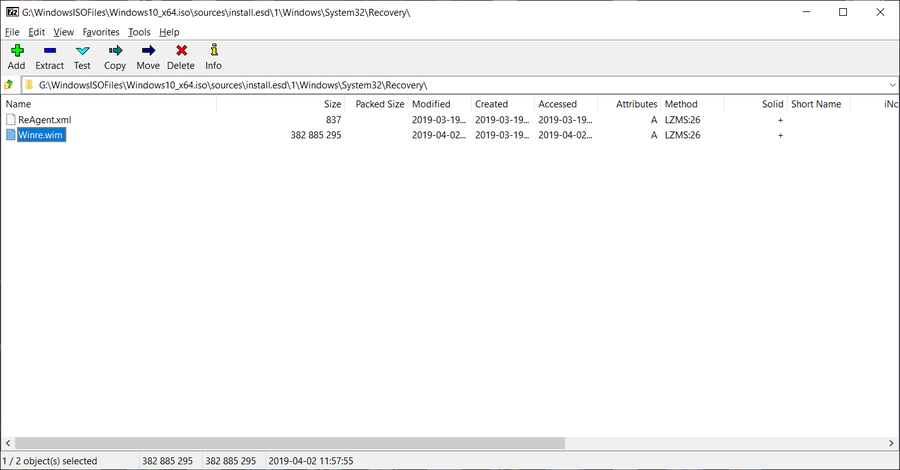
Winre.wim can be copied from a Windows ISO when the file is missing from the installed system.Copy Winre.wim to the local recovery folder
After extracting the file, copy it to:
C:\Windows\System32\Recovery\Winre.wimMake sure the folder exists. If needed, create it first.
Register the path and enable Windows RE
Run these commands in an elevated Command Prompt:
reagentc /setreimage /path C:\Windows\System32\Recovery
reagentc /enable
reagentc /info
If the fix succeeds, reagentc /info should now show Windows RE as enabled with a valid location.
Winre.wim, setting the recovery image path, and enabling WinRE, Windows RE reports as enabled again.Why This Fix Works Even Without a Recovery Partition
Many users assume they must recreate a hidden recovery partition before anything will work again. In practice, that is not always necessary for resolving the immediate Recovery Drive error.
If the original recovery partition is gone, but you provide Windows with a valid Winre.wim file and register it properly, Windows RE can become functional again. That is often enough to restore recovery features and eliminate the “required files are missing” problem.
Key takeaway: when there is no recovery partition and no localWinre.wimfile, copyingWinre.wimfrom a Windows ISO and enabling WinRE can solve the problem without first rebuilding a dedicated recovery partition.
Step-by-Step Summary
- Run
reagentc /infoand confirm Windows RE is disabled - Open Disk Management and verify that there is no recovery partition
- Check
C:\Windows\System32\Recoveryand confirmWinre.wimis missing - Extract
Winre.wimfrom a matching Windows ISO - Copy the file into
C:\Windows\System32\Recovery - Run
reagentc /setreimage /path C:\Windows\System32\Recovery - Run
reagentc /enable - Run
reagentc /infoagain and confirm Windows RE is enabled
What If You Still Cannot Create a Recovery Drive?
If WinRE is enabled again but the Windows Recovery Drive wizard still fails, the built-in Microsoft tool may still be unreliable on that system. This often happens on older installations, heavily modified systems, or machines that have gone through multiple partitioning or cloning operations.
The built-in recovery drive creator is useful, but it is also fragile because it depends on the current Windows recovery configuration being clean and intact.
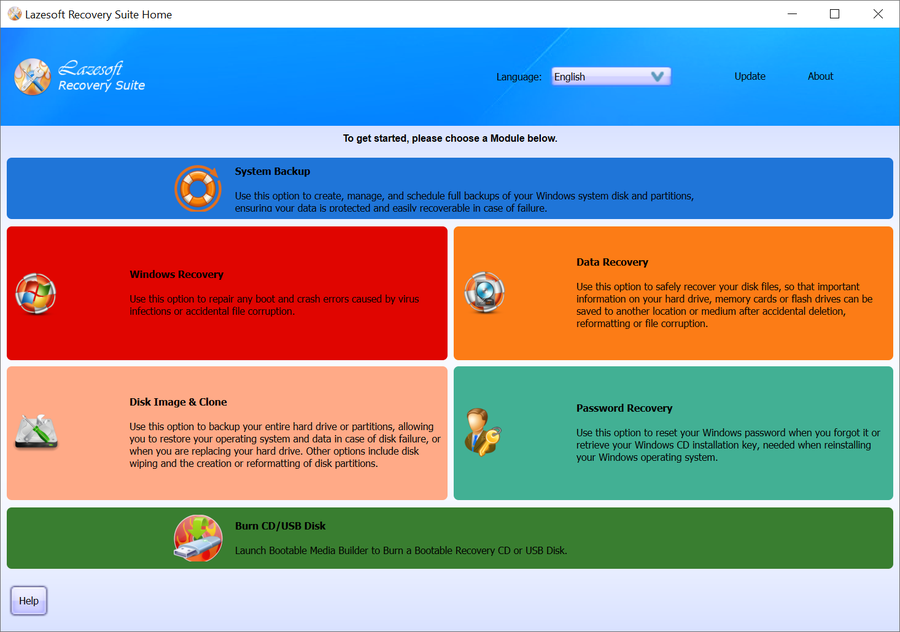
A More Reliable Alternative: Create a Bootable Recovery USB with Lazesoft
When Windows recovery components are damaged, many users simply want a bootable USB that works. In that situation, using a dedicated recovery media builder is often faster and more practical.
Lazesoft Recovery Suite can create a bootable recovery CD or USB disk without depending on the Windows Recovery Drive wizard.
Why Lazesoft Recovery Suite is useful here
- Builds a bootable recovery USB even when Windows recovery settings are broken
- Helps repair boot issues and system problems
- Includes backup, clone, data recovery, and password recovery tools
- Supports BIOS and UEFI systems
- Useful when Windows cannot boot normally
Free policy
- Unlimited free for home users
- 1TB free for professionals
How to create a recovery USB with Lazesoft
- Install and launch Lazesoft Recovery Suite
- Click Burn CD/USB Disk
- Select the target Windows version
- Insert your USB flash drive
- Build the bootable recovery media
This gives you an independent recovery environment that does not depend on the broken state of the current Windows Recovery Drive wizard.
Frequently Asked Questions
Does this error always mean the recovery partition is missing?
No. But in the scenario discussed here, the failure happens because there is no recovery partition and no usable registered Winre.wim file available to Windows RE.
Can I fix the issue just by copying Winre.wim?
Yes, often you can, especially when the recovery partition is gone and the local recovery folder is missing the file. You still need to register the path with reagentc /setreimage and then enable Windows RE.
Do I have to rebuild a recovery partition first?
Not necessarily. If copying Winre.wim from a Windows ISO and enabling WinRE restores recovery functionality, that may be enough to solve the immediate problem.
Should the Winre.wim come from the same Windows version?
Yes. It is best to use a Windows ISO that matches the installed Windows version and architecture as closely as possible.
Conclusion
The error “We can’t create a recovery drive on this PC” is commonly caused by a broken Windows Recovery Environment. In the case shown here, the root cause is more specific: there is no recovery partition, and there is no usable Winre.wim file in C:\Windows\System32\Recovery. Because both are missing from the active recovery setup, Windows cannot build a recovery drive.
The practical fix is often simple: extract Winre.wim from a matching Windows ISO, copy it into the local recovery folder, register the path, and enable Windows RE again. Once Windows RE is enabled, the recovery problem is often resolved.
If you want a more dependable way to build a recovery USB, Lazesoft Recovery Suite provides a straightforward alternative with bootable recovery media creation and additional repair tools.
Download Lazesoft Recovery Suite and build your own recovery USB before the next boot problem happens.