
Windows Boot Repair
How to Fix Error 0xc0000034: “The Boot Configuration Data File Is Missing Some Required Information”
If Windows 10 or Windows 11 stops at a blue Recovery screen with error code 0xc0000034, the Boot Configuration Data file is missing, damaged, or misconfigured. This guide shows two ways to rebuild the BCD: an automatic Lazesoft One Click Fix method and a manual Windows Command Prompt method.
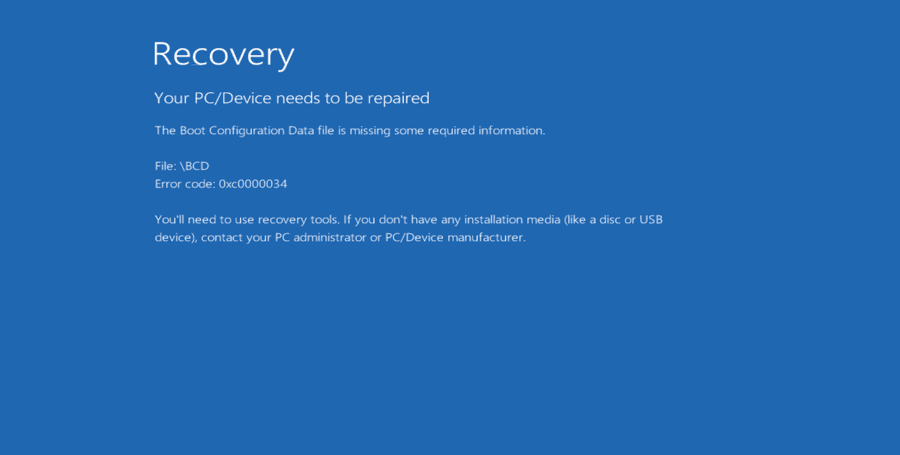
If your computer refuses to start and shows a blue screen with the message below, you're dealing with a corrupted or missing Boot Configuration Data (BCD) file — one of the most common reasons Windows fails to boot.
Recovery
Your PC/Device needs to be repaired
The Boot Configuration Data file is missing some required information.
File: \BCD
Error code: 0xc0000034
You'll need to use recovery tools. If you don't have any installation media (like a disc or USB device), contact your PC administrator or PC/Device manufacturer.
Video Guide: Fix Error 0xc0000034 with Lazesoft One Click Fix
Watch this video to see how to fix the Windows 10/11 0xc0000034 boot error using Lazesoft Recovery Suite Home Edition and the One Click Fix feature.
After watching the video, continue with the full written guide below. It includes both the Lazesoft automatic repair method and the Windows Command Prompt method.
This screen is alarming, but it doesn't mean your files are gone or your hard drive is failing. It simply means Windows can't find the instructions it needs to know how to boot — a bit like a GPS that's lost its map. The good news is that this is almost always fixable, even without much technical experience.
Below are two complete solutions, both explained step by step with screenshots:
- Solution 1: Use the free third-party tool Lazesoft Recovery Suite to automatically rebuild the BCD file with a couple of clicks. This is the easier, more beginner-friendly route.
- Solution 2: Use the built-in Windows
Command Prompt tools (
bootrec) from the Windows installation media or recovery environment. This requires typing a few commands, but it works using only what's included with Windows — no third-party software needed.
You can try either one on its own, or attempt Solution 1 first and fall back to Solution 2 if the automatic tool doesn't fully resolve the issue.
What Causes Error 0xc0000034?
Before jumping into the fix, it helps to understand what's actually going wrong. The BCD (Boot Configuration Data) file is a small database that tells Windows which operating system to load, which drive it's on, and how to load it. When this file becomes corrupted, deleted, or misconfigured, Windows has nowhere to look for boot instructions, and it stops with error 0xc0000034 instead of loading your desktop.
Common causes include:
- A sudden power loss or improper shutdown while Windows was updating
- A failed or interrupted Windows Update
- Changes made to disk partitions (for example, resizing or shrinking a partition)
- Malware or virus infections that damage system files
- Accidentally deleting or modifying boot-related files
- Installing a second operating system alongside Windows (dual-boot conflicts)
Because the issue lives in the boot files rather than your personal data, repairing it typically doesn't put your documents, photos, or programs at risk.
What You'll Need
To follow this guide, you'll need:
- A second, working computer with internet access (to download the recovery tool and create the bootable USB)
- A USB flash drive (8GB or larger is recommended, and note that it will be erased during setup)
- The affected PC, with its BIOS/UEFI set up to allow booting from USB (most modern PCs allow this by pressing a key like F12, F2, Esc, or Del during startup — check your manufacturer's instructions if you're unsure)
With those three things ready, you can move on to the actual repair process.
Free Policy for Home Users
Lazesoft Recovery Suite Home Edition is free for home users. You can create a Lazesoft bootable recovery USB and use Windows Recovery features such as One Click Fix to repair common Windows boot problems.
For business, technician, commercial service, or Windows Server environments, please choose the appropriate Professional, Technician, or Server edition.
Use Lazesoft One Click Fix
Recommended for home users who want a guided, automatic way to rebuild BCD and repair common Windows boot files.
Use Windows Commands
Recommended for advanced users who can boot into Windows Recovery Environment and run boot repair commands carefully.
Solution 1: Fix Error 0xc0000034 with Lazesoft Recovery Suite
Step 1: Create a Lazesoft Recovery Suite Bootable USB
Since the problem PC can't boot into Windows, you can't run repair software directly on it. Instead, you need to build a bootable USB drive on a different, working computer, and then use that USB drive to start the broken PC.
On the working computer:
- Download Lazesoft Recovery Suite Home Edition from the official Lazesoft website.
- Install it and launch the program.
- Use its built-in bootable media creation wizard to write the recovery environment onto your USB drive. This process formats the drive and copies over a lightweight, self-contained version of the recovery tools, so it will run even though the problem PC's own Windows installation is broken.
- Once the USB drive is ready, safely eject it from the working computer.
Now take the USB drive to the PC displaying the 0xc0000034 error:
- Plug the USB drive into the affected computer.
- Power it on and enter the boot menu (commonly by tapping F12, F11, F2, Esc, or Delete right after pressing the power button — this varies by manufacturer).
- Select the USB drive as the boot device.
The PC should now boot into the Lazesoft Recovery Suite environment instead of trying to load the damaged Windows installation.
Step 2: Open Lazesoft Recovery Suite and Select Windows Recovery
Once Lazesoft Recovery Suite finishes loading, you'll see its main home screen with four colored modules to choose from: System Backup, Windows Recovery, Data Recovery, Disk Image & Clone, and Password Recovery.
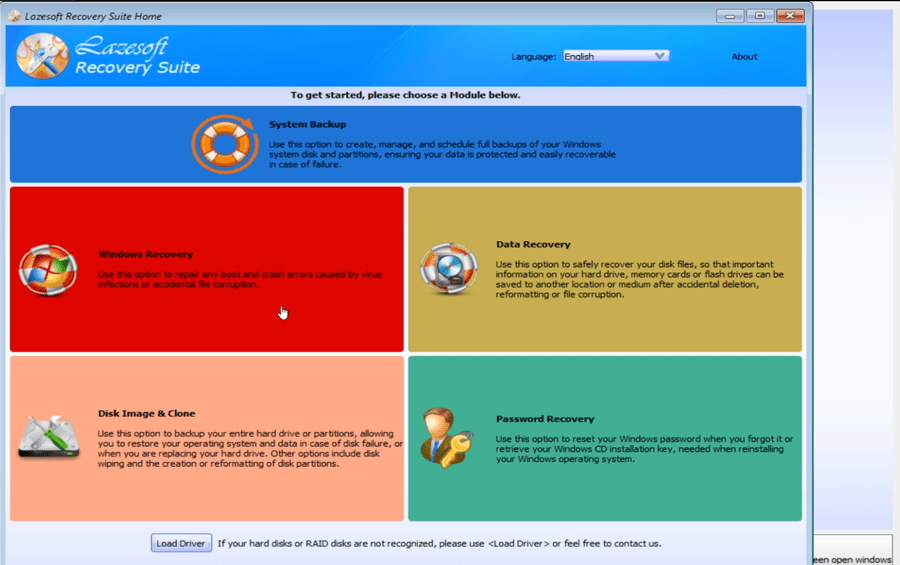
Since your goal is to fix the boot error rather than recover deleted files or reset a password, click on Windows Recovery (the red tile). This module is specifically designed to repair boot and crash errors, including the kind caused by a damaged BCD file, missing boot sector data, or a corrupted Master Boot Record (MBR).
Step 3: Choose the Windows Installation You Want to Repair
After selecting Windows Recovery, Lazesoft will scan the hard drive and display any Windows installations it finds. You'll be presented with a dialog listing the detected installation, along with useful details such as the Windows edition, boot volume, and which physical disk it's installed on.
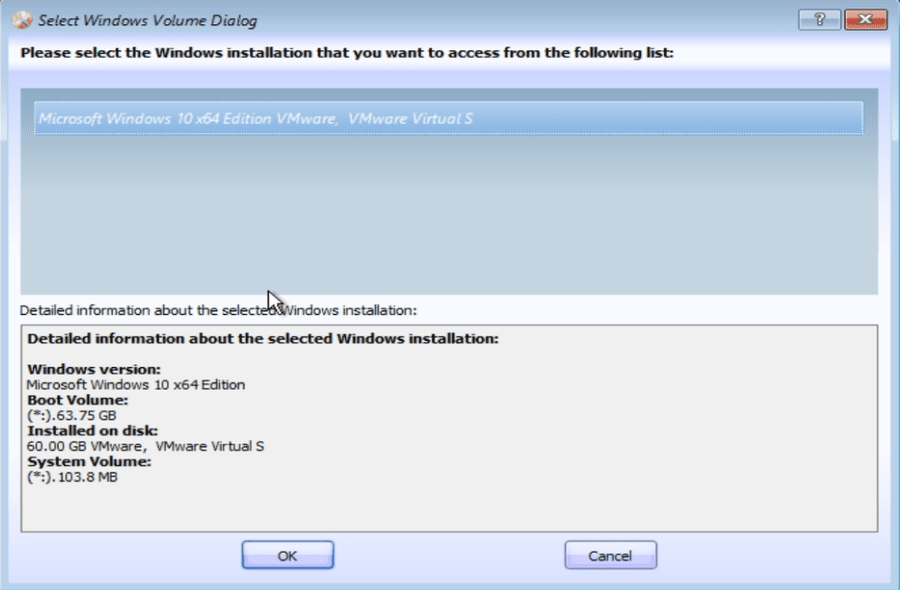
In most cases there will only be one entry to choose from, especially on a single-drive PC. Select the correct Windows installation from the list — you can confirm you have the right one by checking the details panel underneath, which shows information like the Windows version, boot volume size, and the disk it's installed on. Then click OK to proceed.
Step 4: Open One Click Fix
With your Windows installation selected, you'll land on the Lazesoft Windows Recovery overview screen. This page lists several repair options, each matching a different type of startup problem:
- One Click Fix Crash Solution — a fast, automatic, and fully undoable repair recommended for most users
- Boot Crash Solution — for computers that always crash to a black screen before reaching the Windows loading bar
- Loading Crash Solution — for computers that crash while the Windows loading bar or welcome screen is showing
- Random Crash Solution — for less predictable freezing, rebooting, or blue-screen issues
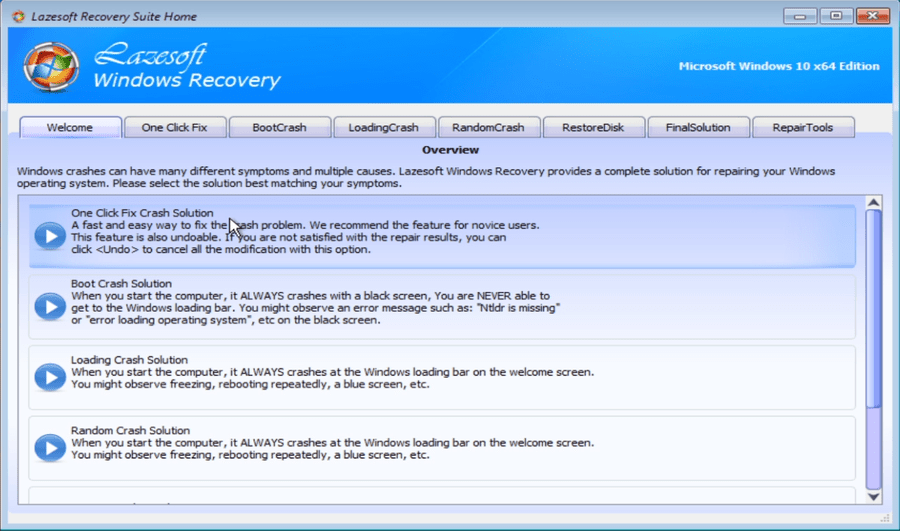
For a BCD-related error like 0xc0000034, the One Click Fix Crash Solution is exactly what you want. It's built to automatically detect and repair common Windows boot problems, including issues with the Master Boot Record, the boot sector, the boot indicator, and — most importantly for this error — the BCD file itself. Click on the One Click Fix tab (or the corresponding entry in the list) to continue.
Once inside the One Click Fix tab, you'll see a short description confirming what the tool does, along with two buttons: One Click Fix and Undo.
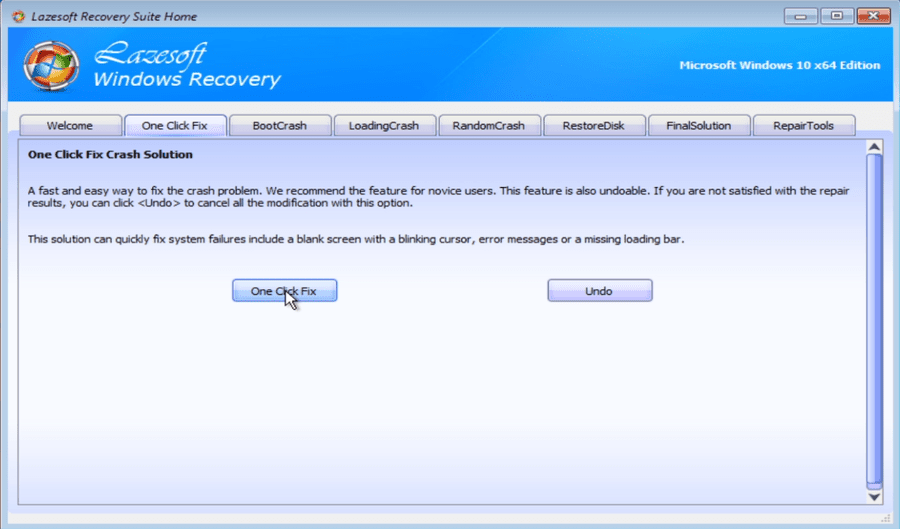
This screen also reassures you that the repair is reversible: if for any reason the fix doesn't resolve your issue or you want to revert the changes, you can return here and click Undo to restore things to how they were before.
Step 5: Run One Click Fix and Let the Wizard Repair Your Boot Files
Click the One Click Fix button to begin. A new window titled "One Click Fix Windows Wizard" will open and immediately start checking and repairing your Windows boot problems.
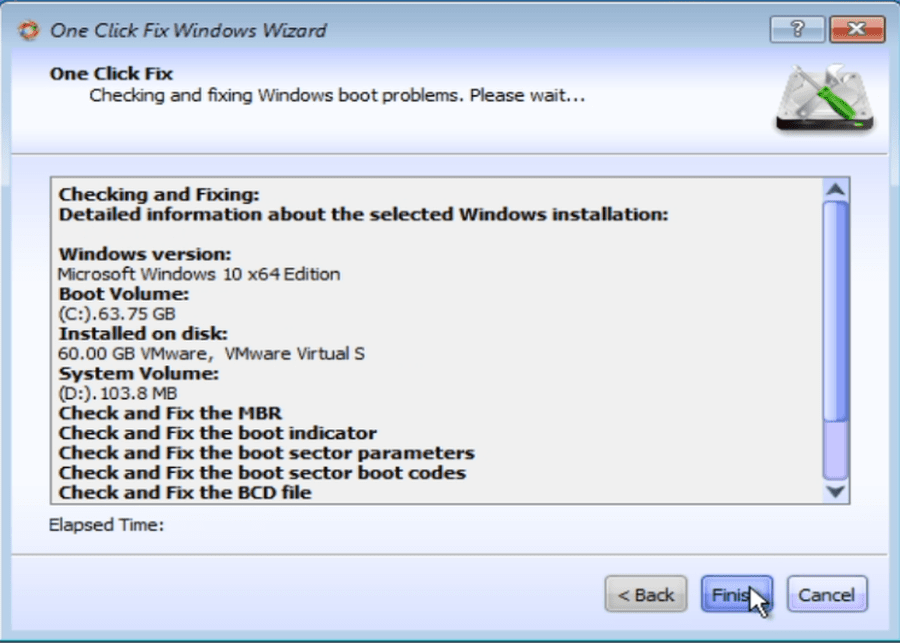
While the wizard runs, it displays a live log of what it's doing, along with detailed information about the Windows installation being repaired, such as:
- The Windows version detected
- The boot volume and its size
- The disk the system is installed on
- The system volume location
Below that, you'll see the specific checks the tool performs, including:
- Check and Fix the MBR (Master Boot Record)
- Check and Fix the boot indicator
- Check and Fix the boot sector parameters
- Check and Fix the boot sector boot codes
- Check and Fix the BCD file
That last item is the one directly responsible for resolving error 0xc0000034. Lazesoft rebuilds the Boot Configuration Data file so it correctly points to your Windows installation again. This process usually only takes a few seconds to a couple of minutes, depending on your hardware.
There's no need to click anything else during this stage — just let the wizard finish its checks. An elapsed time counter at the bottom of the window lets you track how long the process has been running.
Step 6: Finish, Remove the USB Drive, and Restart
Once the wizard has completed all of its checks and repairs, the Finish button at the bottom of the window will become active (it may have appeared grayed out while the scan was in progress). Click Finish to close the repair wizard.
At this point:
- Shut down or restart the computer through the Lazesoft interface, or simply power it off.
- Remove the USB drive before the PC starts booting again — you want it to boot from the internal hard drive now, not the recovery USB.
- Power the computer back on normally.
If everything went as expected, Windows will boot straight past the blue recovery screen and take you to the normal Windows sign-in screen.

Seeing your familiar lock screen — with the time, date, and your desktop background — is confirmation that the repair worked and the BCD file has been successfully rebuilt.
Solution 2: Fix Error 0xc0000034 with Windows Command Prompt
If you'd rather not install third-party software, or Solution 1
didn't fully resolve the issue, you can rebuild the BCD file manually
using the Command Prompt tools built into Windows itself. This method
uses bootrec, a command-line utility included with every
copy of Windows, specifically designed to repair the Master Boot Record,
boot sector, and Boot Configuration Data.
What You'll Need for This Method
- A Windows installation USB or DVD that matches the version of Windows installed on the problem PC (you can create one on a working computer using Microsoft's free Media Creation Tool), or
- Access to the PC's built-in Windows Recovery Environment (WinRE), if it's still available despite the boot error
Step 1: Boot from Windows Installation Media (or Enter WinRE)
- Plug the Windows installation USB into the affected PC.
- Power on the PC and enter the boot menu (typically F12, F11, F2, Esc, or Delete, depending on the manufacturer) and select the USB drive.
- On the "Windows Setup" screen, choose your language and keyboard preferences, then click Next.
- Instead of clicking Install now, click Repair your computer in the lower-left corner.
If the PC boots automatically into a blue recovery screen (as pictured at the top of this article) without needing installation media, you're already in WinRE and can skip ahead to the next step.
Step 2: Open Command Prompt from the Recovery Environment
From the recovery screen, navigate through the menus as follows:
- Select Troubleshoot.
- Select Advanced options.
- Select Command Prompt.
This opens a black command-line window running with administrator privileges, which is what you'll use to rebuild the boot files.
Step 3: Run the Bootrec Commands
At the command prompt, type each of the following commands one at a time, pressing Enter after each and waiting for it to complete before moving to the next:
bootrec /fixmbr
bootrec /fixboot
bootrec /scanos
bootrec /rebuildbcd
Here's what each command does:
bootrec /fixmbr— Writes a new, standard Master Boot Record to the system partition, without overwriting the existing partition table.bootrec /fixboot— Writes a new boot sector to the system partition, using one that's compatible with the current version of Windows.bootrec /scanos— Scans all disks for Windows installations that are compatible with the BCD, and reports back what it finds.bootrec /rebuildbcd— Scans for Windows installations again and gives you the option to add any it finds to the BCD, effectively rebuilding the file from scratch.
When you run bootrec /rebuildbcd, it will typically show
something like "Total identified Windows installations: 1" followed by a
prompt asking Add installation to boot list?. Type
Y and press Enter to confirm.
Step 4: If Rebuildbcd Finds 0 Windows Installations
Occasionally, bootrec /rebuildbcd reports
0 Windows installations found, even though Windows is
clearly installed. If this happens, the existing BCD store may be too
corrupted for the tool to read, and you'll need to rebuild it from
scratch with these additional commands:
bcdedit /export C:\BCD_Backup
attrib c:\boot\bcd -h -r -s
ren c:\boot\bcd bcd.old
bootrec /rebuildbcd
This backs up the existing (broken) BCD file, unhides and unlocks it, renames it out of the way, and then runs the rebuild command again so Windows creates a brand-new BCD file rather than trying to repair the damaged one.
Note: If your Windows installation is not on the C: drive, substitute the correct drive letter in the commands above. You can use the
bcdeditcommand ordiskpartto check drive letters from within the recovery Command Prompt if you're unsure.
Step 5: Exit and Restart
Once the commands have completed successfully:
- Type
exitand press Enter to close the Command Prompt. - Remove the installation USB drive.
- Restart the computer.
Windows should now boot normally, past the 0xc0000034 error screen and straight to your sign-in screen.
Solution 1 vs. Solution 2: Which Should You Use?
| Solution 1: Lazesoft Recovery Suite | Solution 2: Command Prompt (bootrec) | |
|---|---|---|
| Ease of use | Beginner-friendly, point-and-click | Requires typing exact commands |
| Software needed | Free third-party tool | None — built into Windows |
| Media required | Lazesoft bootable USB | Windows installation USB/DVD, or existing WinRE |
| Reversible | Yes, has an "Undo" option | No built-in undo, but low risk |
| Best for | Users who prefer a guided, automated repair | Users comfortable with basic command-line steps |
Both methods rebuild the same underlying BCD file, so neither is inherently more effective than the other — it mainly comes down to whether you'd rather click a single button or type a short sequence of commands.
What If the Problem Comes Back?
For most users, the One Click Fix repair resolves error 0xc0000034 permanently, since it directly rebuilds the corrupted BCD file and repairs related boot sector issues. However, if the error returns shortly after, it can be a sign of a deeper issue, such as:
- A failing hard drive (worth checking with a disk health/SMART tool)
- Ongoing malware activity that keeps damaging system files
- A recent Windows Update that didn't install cleanly
In these cases, you can re-run the One Click Fix tool, or explore Lazesoft's other repair options (Boot Crash, Loading Crash, or Random Crash Solutions) depending on the exact symptoms you're seeing. The Disk Image & Clone and Data Recovery modules on the Lazesoft home screen are also worth knowing about — the former lets you create a full backup of your drive so you have a safety net if something like this happens again, and the latter can help retrieve files if a future issue is more serious than a boot configuration problem.
Final Thoughts
Error 0xc0000034 looks intimidating because it appears before Windows even has a chance to start, but it's rarely a sign of serious hardware failure or data loss. In almost every case, it comes down to one small but critical file — the BCD — losing the information Windows needs to find and load itself.
Whether you choose the guided, automated approach with Lazesoft
Recovery Suite or the manual bootrec commands built into
Windows, both methods target the same root cause: rebuilding a damaged
or missing BCD file so Windows knows how to boot again. If the issue was
caused by a damaged or missing BCD file, Windows should boot again
successfully once you've completed either set of steps above, and you
can get back to using your PC without needing a full reinstall.