How to build a Windows 10 / Windows 11 USB System Repair Disc
A Windows “system repair” USB is a lifesaver when Windows won’t boot, updates break the system, or a disk fails. On Windows 10 and Windows 11, Microsoft’s recovery environment (WinRE) provides tools like Startup Repair, System Restore, Command Prompt, and (on many PCs) Reset this PC.
In this guide, we introduce a few free ways to create a bootable Windows 10/11 recovery USB. The first method is the easiest and includes extra repair and data recovery tools.
First Method: Use Lazesoft Recovery Suite Home Edition (Recommended)
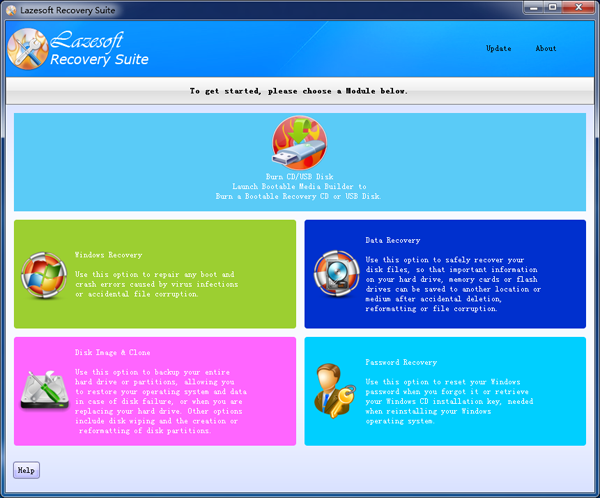
With Lazesoft Recovery Suite Home Edition, you can quickly create a bootable Windows recovery USB disk. The USB disk includes Windows recovery features plus many additional free tools, such as: data recovery, password recovery, Windows recovery, disk clone, and disk imaging.
The following are the steps to build a Windows 10/11 recovery USB with Lazesoft Recovery Suite Home Edition:
- Install Lazesoft Recovery Suite Home Edition, then launch it.
- Click "Burn CD/USB Disk" on the home page. The Lazesoft Media Builder will run.
- Insert a USB flash drive into your computer. (If it contains important files, please back them up first.)
- On the welcome page, click <Next> to continue.
- Select USB disk, choose your inserted USB drive, then click <Start> to begin.
- Please wait until the build process finishes. When completed, click <Next> to the finish page.
Your Windows 10/11 bootable recovery USB disk is now ready.
Second Method: Use Windows built-in “Recovery Drive” tool (Windows 10/11)
Windows 10 and Windows 11 can create a recovery USB directly using the built-in Recovery Drive wizard. This is the simplest Microsoft method and works well for most users.
- Insert a USB flash drive (8 GB or larger is recommended; Windows may require more).
- Open the Start menu and search for Recovery Drive, then run Create a recovery drive.
- If prompted by UAC, click Yes.
- On the wizard page, you may see an option like "Back up system files to the recovery drive".
- Checked: more complete recovery options (and may enable reinstall/reset features), but needs more space.
- Unchecked: creates a smaller repair USB focused on WinRE tools.
- Select your USB drive, then click Create.
- Wait for the process to finish, then click Finish.
After it is created, boot from the USB to access Windows recovery options such as Startup Repair, System Restore, Command Prompt, etc.
Third Method: Manually create a Windows 10/11 bootable recovery USB from ISO (Advanced)
If you have a Windows 10/11 installation ISO (or installation USB), you can manually create a bootable USB. This method is useful when the Recovery Drive tool is unavailable or fails.
Important notes (UEFI / Secure Boot):
- Most modern PCs boot in UEFI mode and often require the USB to be FAT32 to boot reliably.
- FAT32 has a 4 GB single-file size limit. Some Windows installation media contain
install.wimlarger than 4 GB. - If your ISO contains a large
install.wim, you can either:- Use a tool that automatically handles UEFI + large files (recommended), or
- Split the WIM into smaller files (advanced), or
- Use NTFS (may not boot on some UEFI/Secure Boot systems depending on firmware).
Steps (common UEFI-friendly approach):
- Insert your USB flash drive and back up any important files on it.
- Open Command Prompt as administrator.
- Run DISKPART:
diskpart
list disk
select disk 1
clean
create partition primary
format fs=fat32 quick
assign
exit
Replace
1with the correct USB disk number. - Mount the Windows 10/11 ISO (right-click ISO → Mount) or insert the installation DVD/USB.
- Copy all files and folders from the mounted ISO (or installation media) to the USB drive.
Now you can boot from the USB. On most systems, press the boot menu key (often F12, Esc, F9, or similar) and select the USB device (UEFI entry if available).
How to use the recovery USB to repair Windows
After booting from your recovery USB, choose the repair path:
- Windows Recovery Environment (WinRE) → Troubleshoot → Advanced options
- Common tools:
- Startup Repair (fix boot issues)
- System Restore (roll back system state)
- Command Prompt (advanced repair commands)
- Uninstall Updates (remove problematic updates)
- System Image Recovery (restore from a system image, if you have one)
Tip: If your PC ignores the USB, check BIOS/UEFI settings: confirm USB boot is enabled, try a different USB port, and on some devices disable/enable Secure Boot temporarily. Also try rebuilding the USB as FAT32 for UEFI compatibility.
Lazesoft Recovery Suite is easy to use, powerful boot disk design to Recover Data, Recover crashed Windows System, Recover Windows Password, Clone or Backup Disk, etc.
Free Windows recovery manual
build a Windows 7 USB System Repair Disc
Fix Error 0xc000000f - BCD Missing
Fix a damaged MBR for Windows XP
Fix a Windows XP Loading Crash
Fix 'Operating system not found'
fix Windows Server 2008 BOOTMGR is missing Error
fix the 'Hal.dll is Missing' error
Start Menu on Lazesoft boot disk
Build Windows 7 System Repair Disc
Build Windows 8 recovery USB disk